
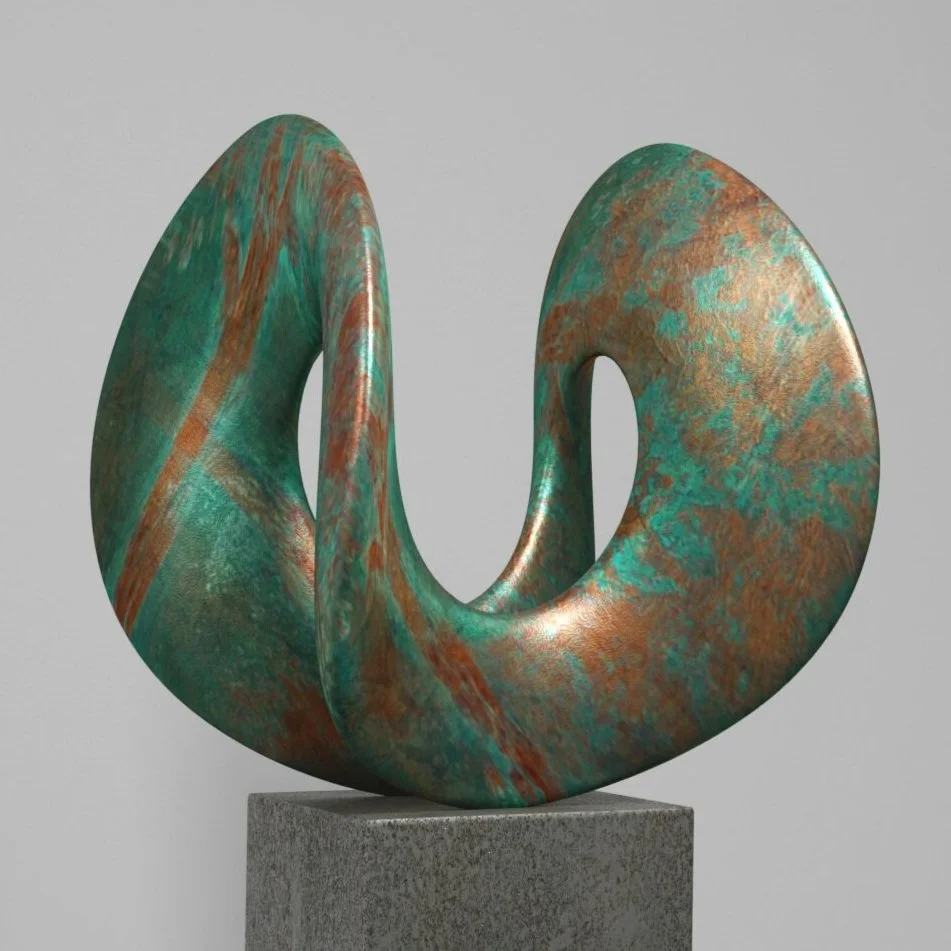
Orange and Copper Patina Recipe and Method
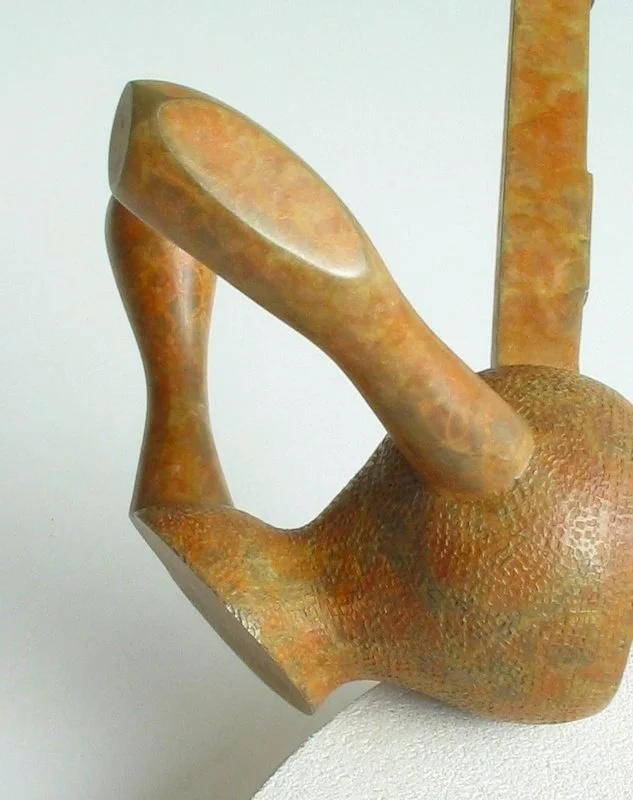
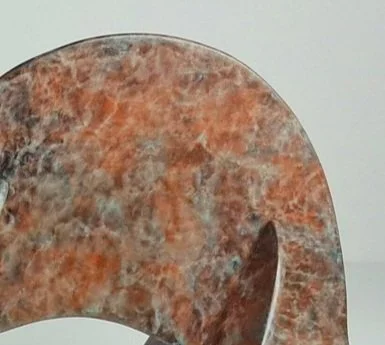
Orange and Copper Patina
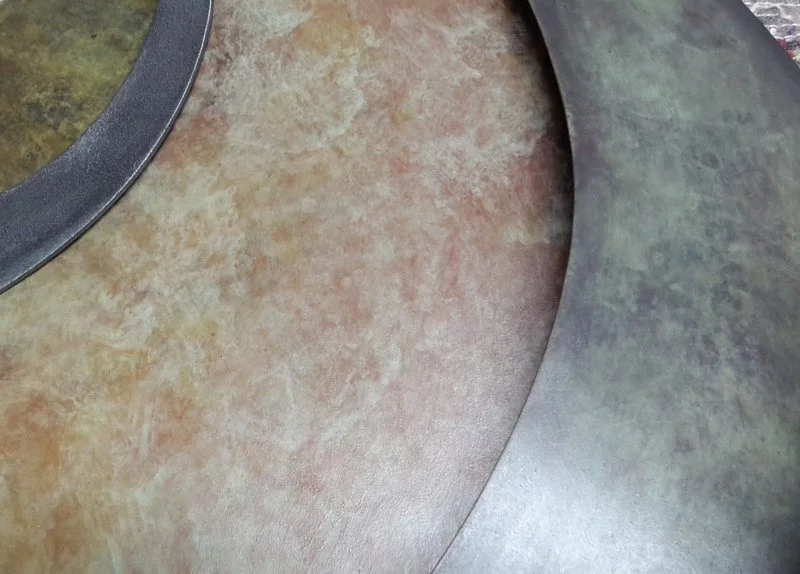
Beautiful stone like patina, with intense orange tones and a blue green speckle in the background. I have tried a range of orange pigments and have found that chromium orange pigment works incredibly well, it adheres very well to the bronze and doesn't seem to change its properties when heated. The key to this patination as with many patinas, is to be very subtle in the application of the main colour, the surface can easily become overloaded, leading to a dull opaque colour. This is a very diverse and stable patina, so is a great component to a transitional or compositional patina.
Metal Preparation
Cast Silicon bronze
Sand to a smooth 80 or 120 grit finish to ensure optimal adhesion.
Base Coat Colour
M20 Antiquing Solution / Liver of Sulphur / Ammonium Sulphide
Warm the bronze gently, taking care not to overheat.
Apply a weak solution of M20 evenly, allowing the surface to develop colour gradually.
Rinse thoroughly with water and brush to neutralise the reaction and remove residue.
Heat until a fine dusty film forms on the surface, then use a soft abrasive pad (e.g., 120 grit Scotch-Brite) to remove it.
Wash and repeat until you reach the desired finish.
First Coat
Water 250ml
2 teaspoons Medium Copper Nitrate
Heat the bronze evenly so the solution lightly sizzles and evaporates upon contact.
Carefully take small amounts of solution into the brush at each application, as the brush warms up it naturally sucks the solution into the brush.
This coat is all about establishing a background colour, I generally look to achieve an uneven patterned coat across the entire sculpture.
Leave parts of the dark base coat or bronze visible for contrast.
Second Coat
Solution 1 :
250ml water
1 teaspoon weak copper nitrate solution
Solution 2 :
250ml water
½ teaspoon chromium orange pigment
add a small amount of weak sodium silicate solution (as a fixative)
Heat the bronze evenly so the solution lightly sizzles and evaporates upon contact.
Stir solution 2 often to keep chromium orange suspended, as it settles quickly.
Apply both solutions in small amounts with a natural-hair brush, working in a dabbing motion to create a broken, mottled orange blue / green pattern. Avoid pooling or runs to maintain a light, transparent effect.
The oxide that forms on the surface of the bronze should develop into a mottled pattern or hoop with a blurred centre. Using different shaped brushes and applications you will be able to develop different patterning.
Finishing Touches
1. Sealing
Sculpt Nouveau Smart Coat (1K Polymer Sealant) / Incralac Lacquer
Apply thin coats at room temperature using a soft cloth or brush.
Allow each coat to dry completely before applying the next.
2. Highlighting
Mix a small amount of pigment with the sealant and use a sponge or brush to add subtle highlights where needed.
3. Shadowing
Prepare a translucent paste by thinning graphite wax with clear wax.
Apply to create shadows or darken areas as desired, either under or over the final wax layers.
Final Waxing
Product : Renaissance Wax / Paste wax /Ceramic Wax
Apply thin layers with a soft brush.
Let each layer sit for 10 minutes to evaporate, then buff to a hard finish.
Repeat 3–4 times for a rich, durable surface.
Tips for Success
Avoid overloading the brush to prevent solid, opaque patches. Focus on a light, broken texture and gradually build up a consistent pattern.
Control heat to avoid unwanted discolouration.
Sealing enhances the patina’s vibrancy, much like dipping a dusty pebble in water to reveal its colours.
Adjust the recipe to develop variations to suit your specific needs.

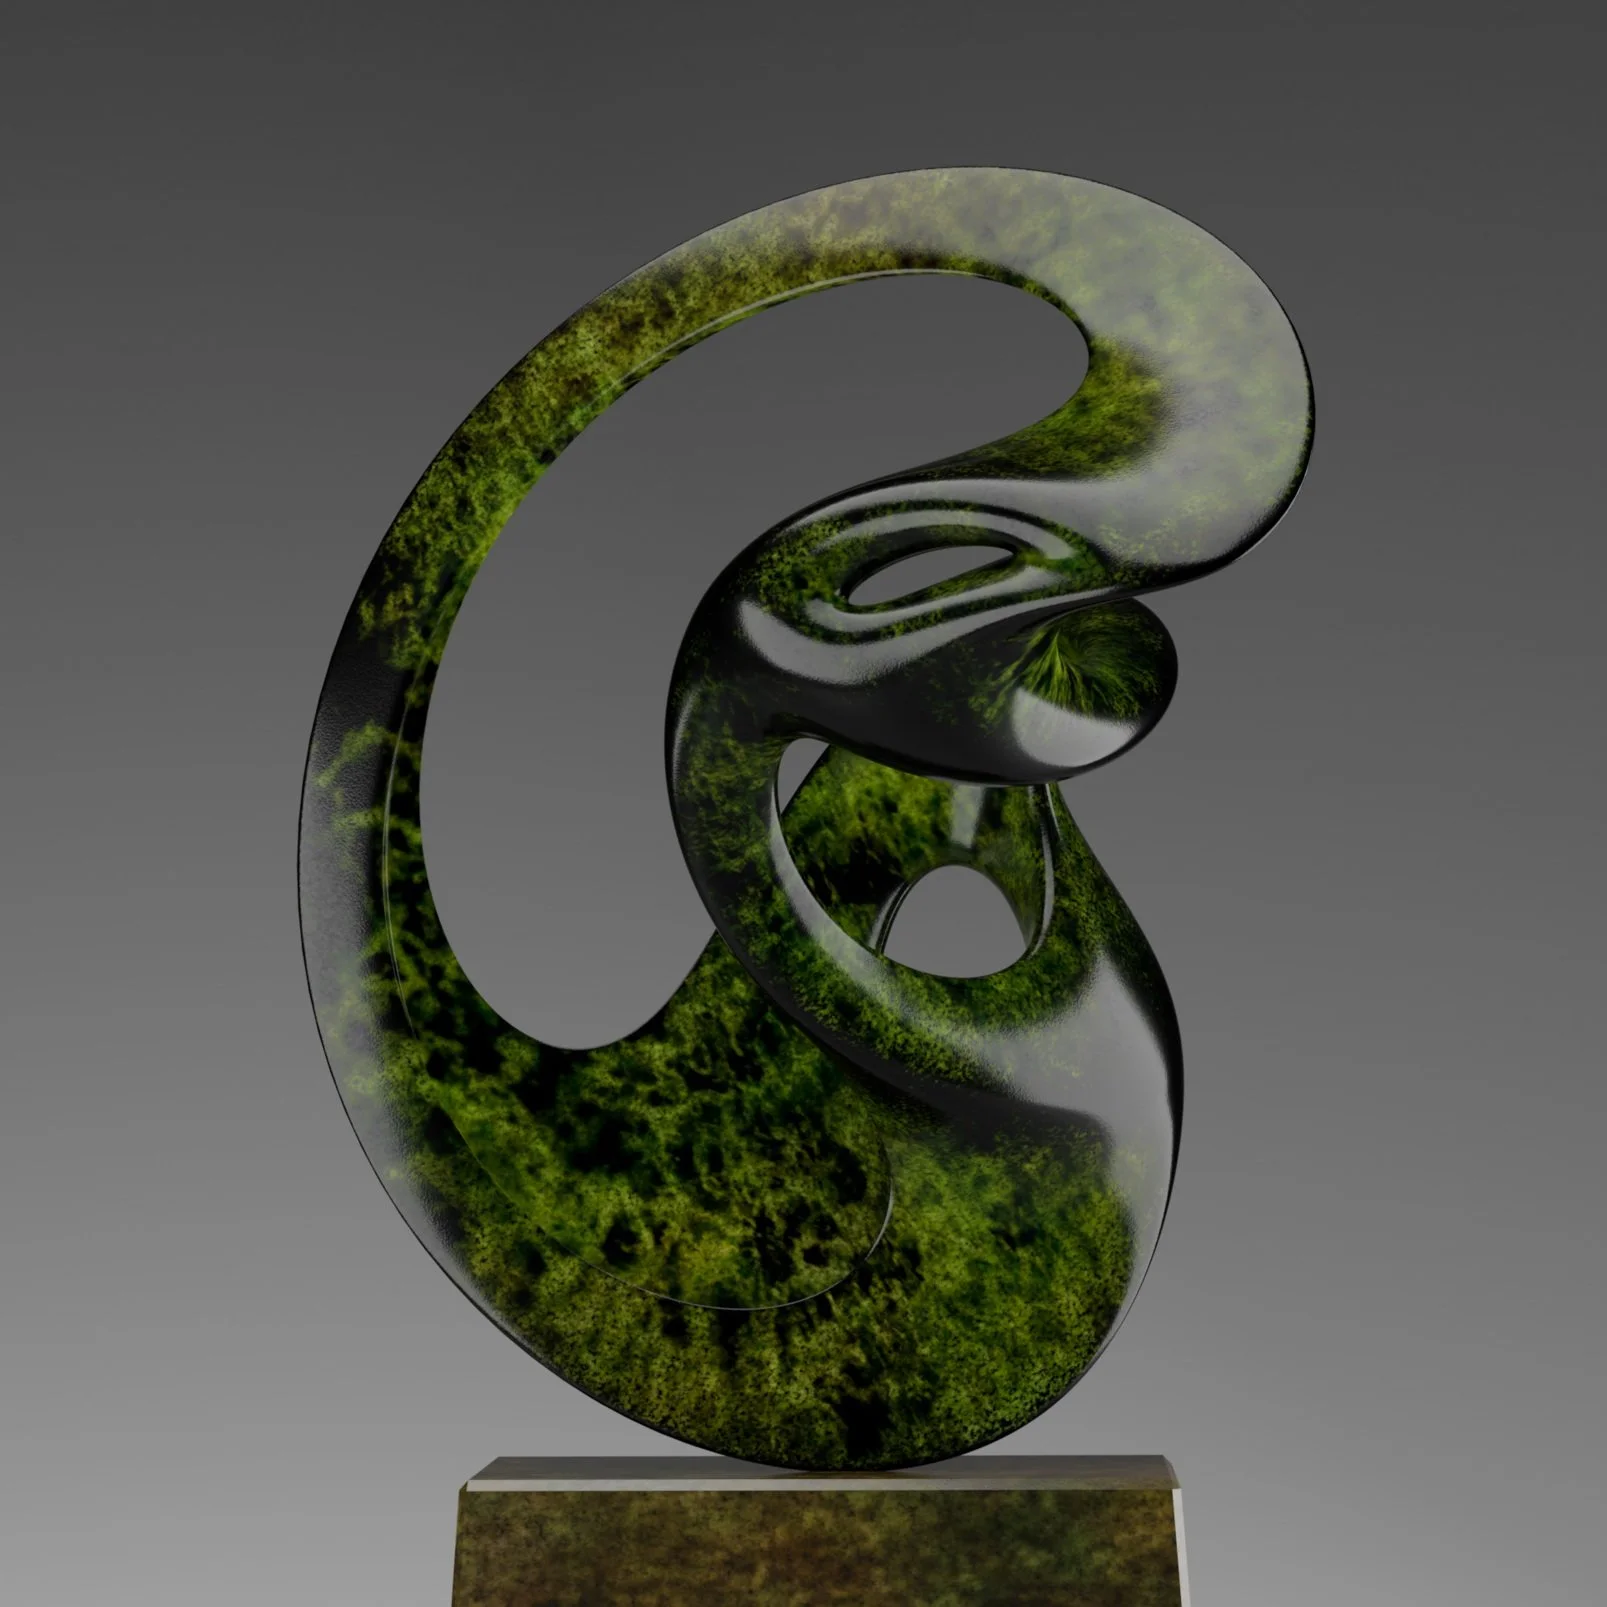
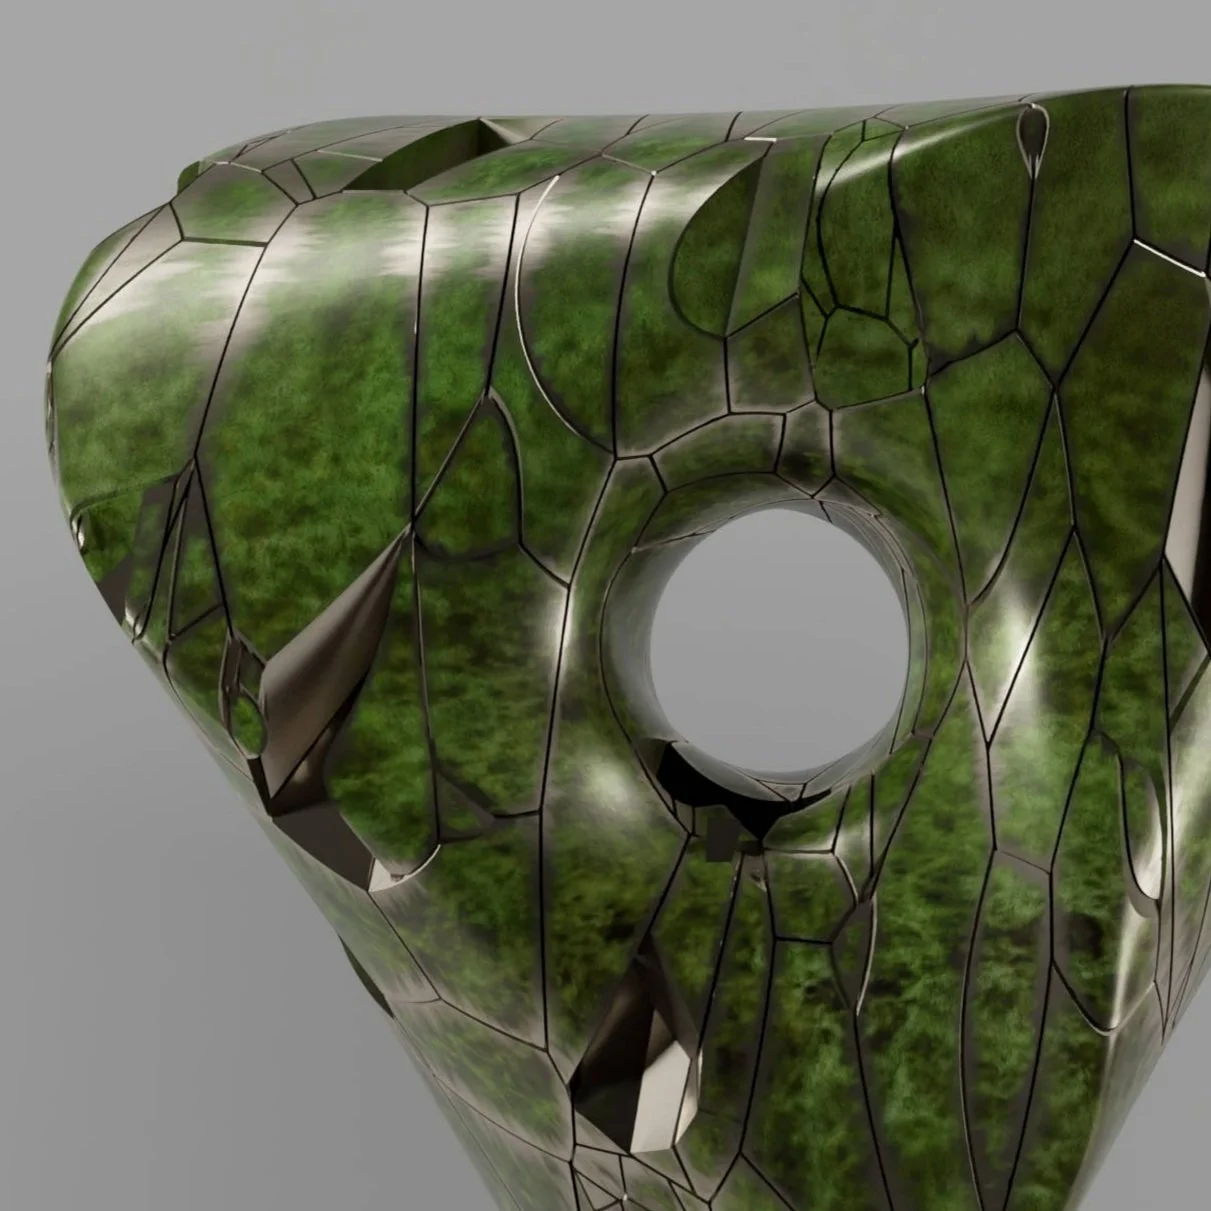
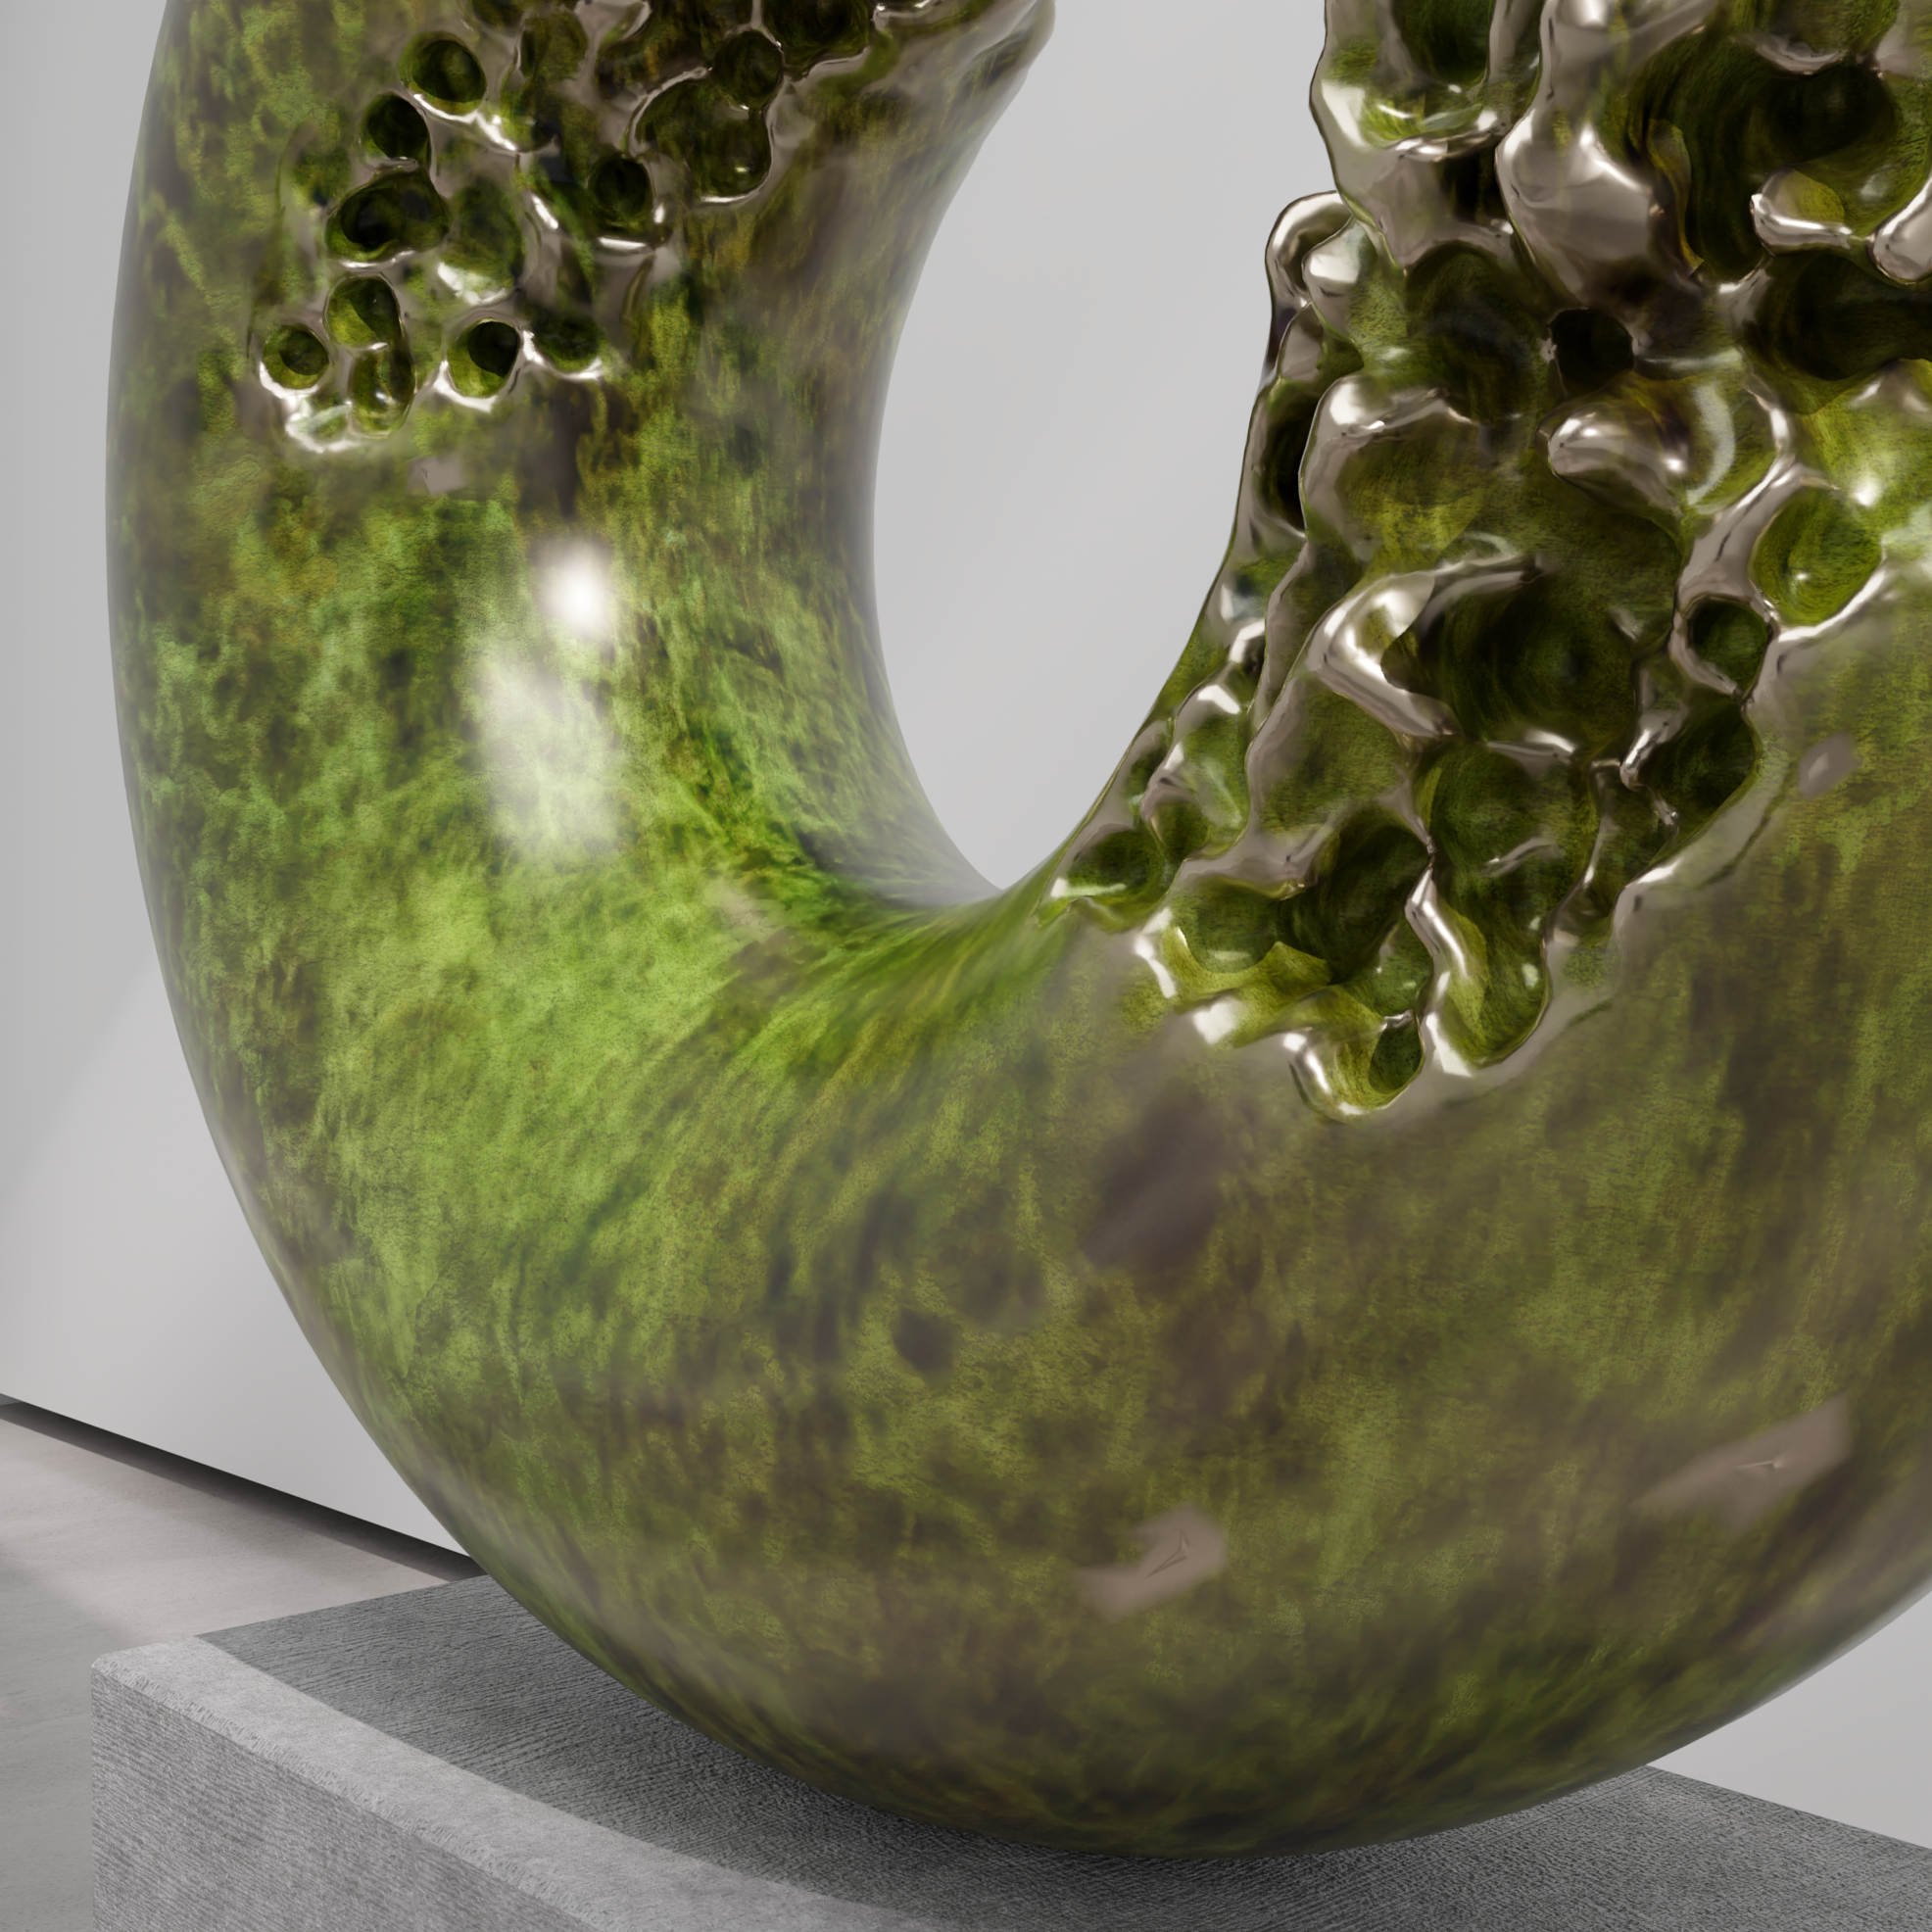
Iron and Copper Green Patina Recipe and Method
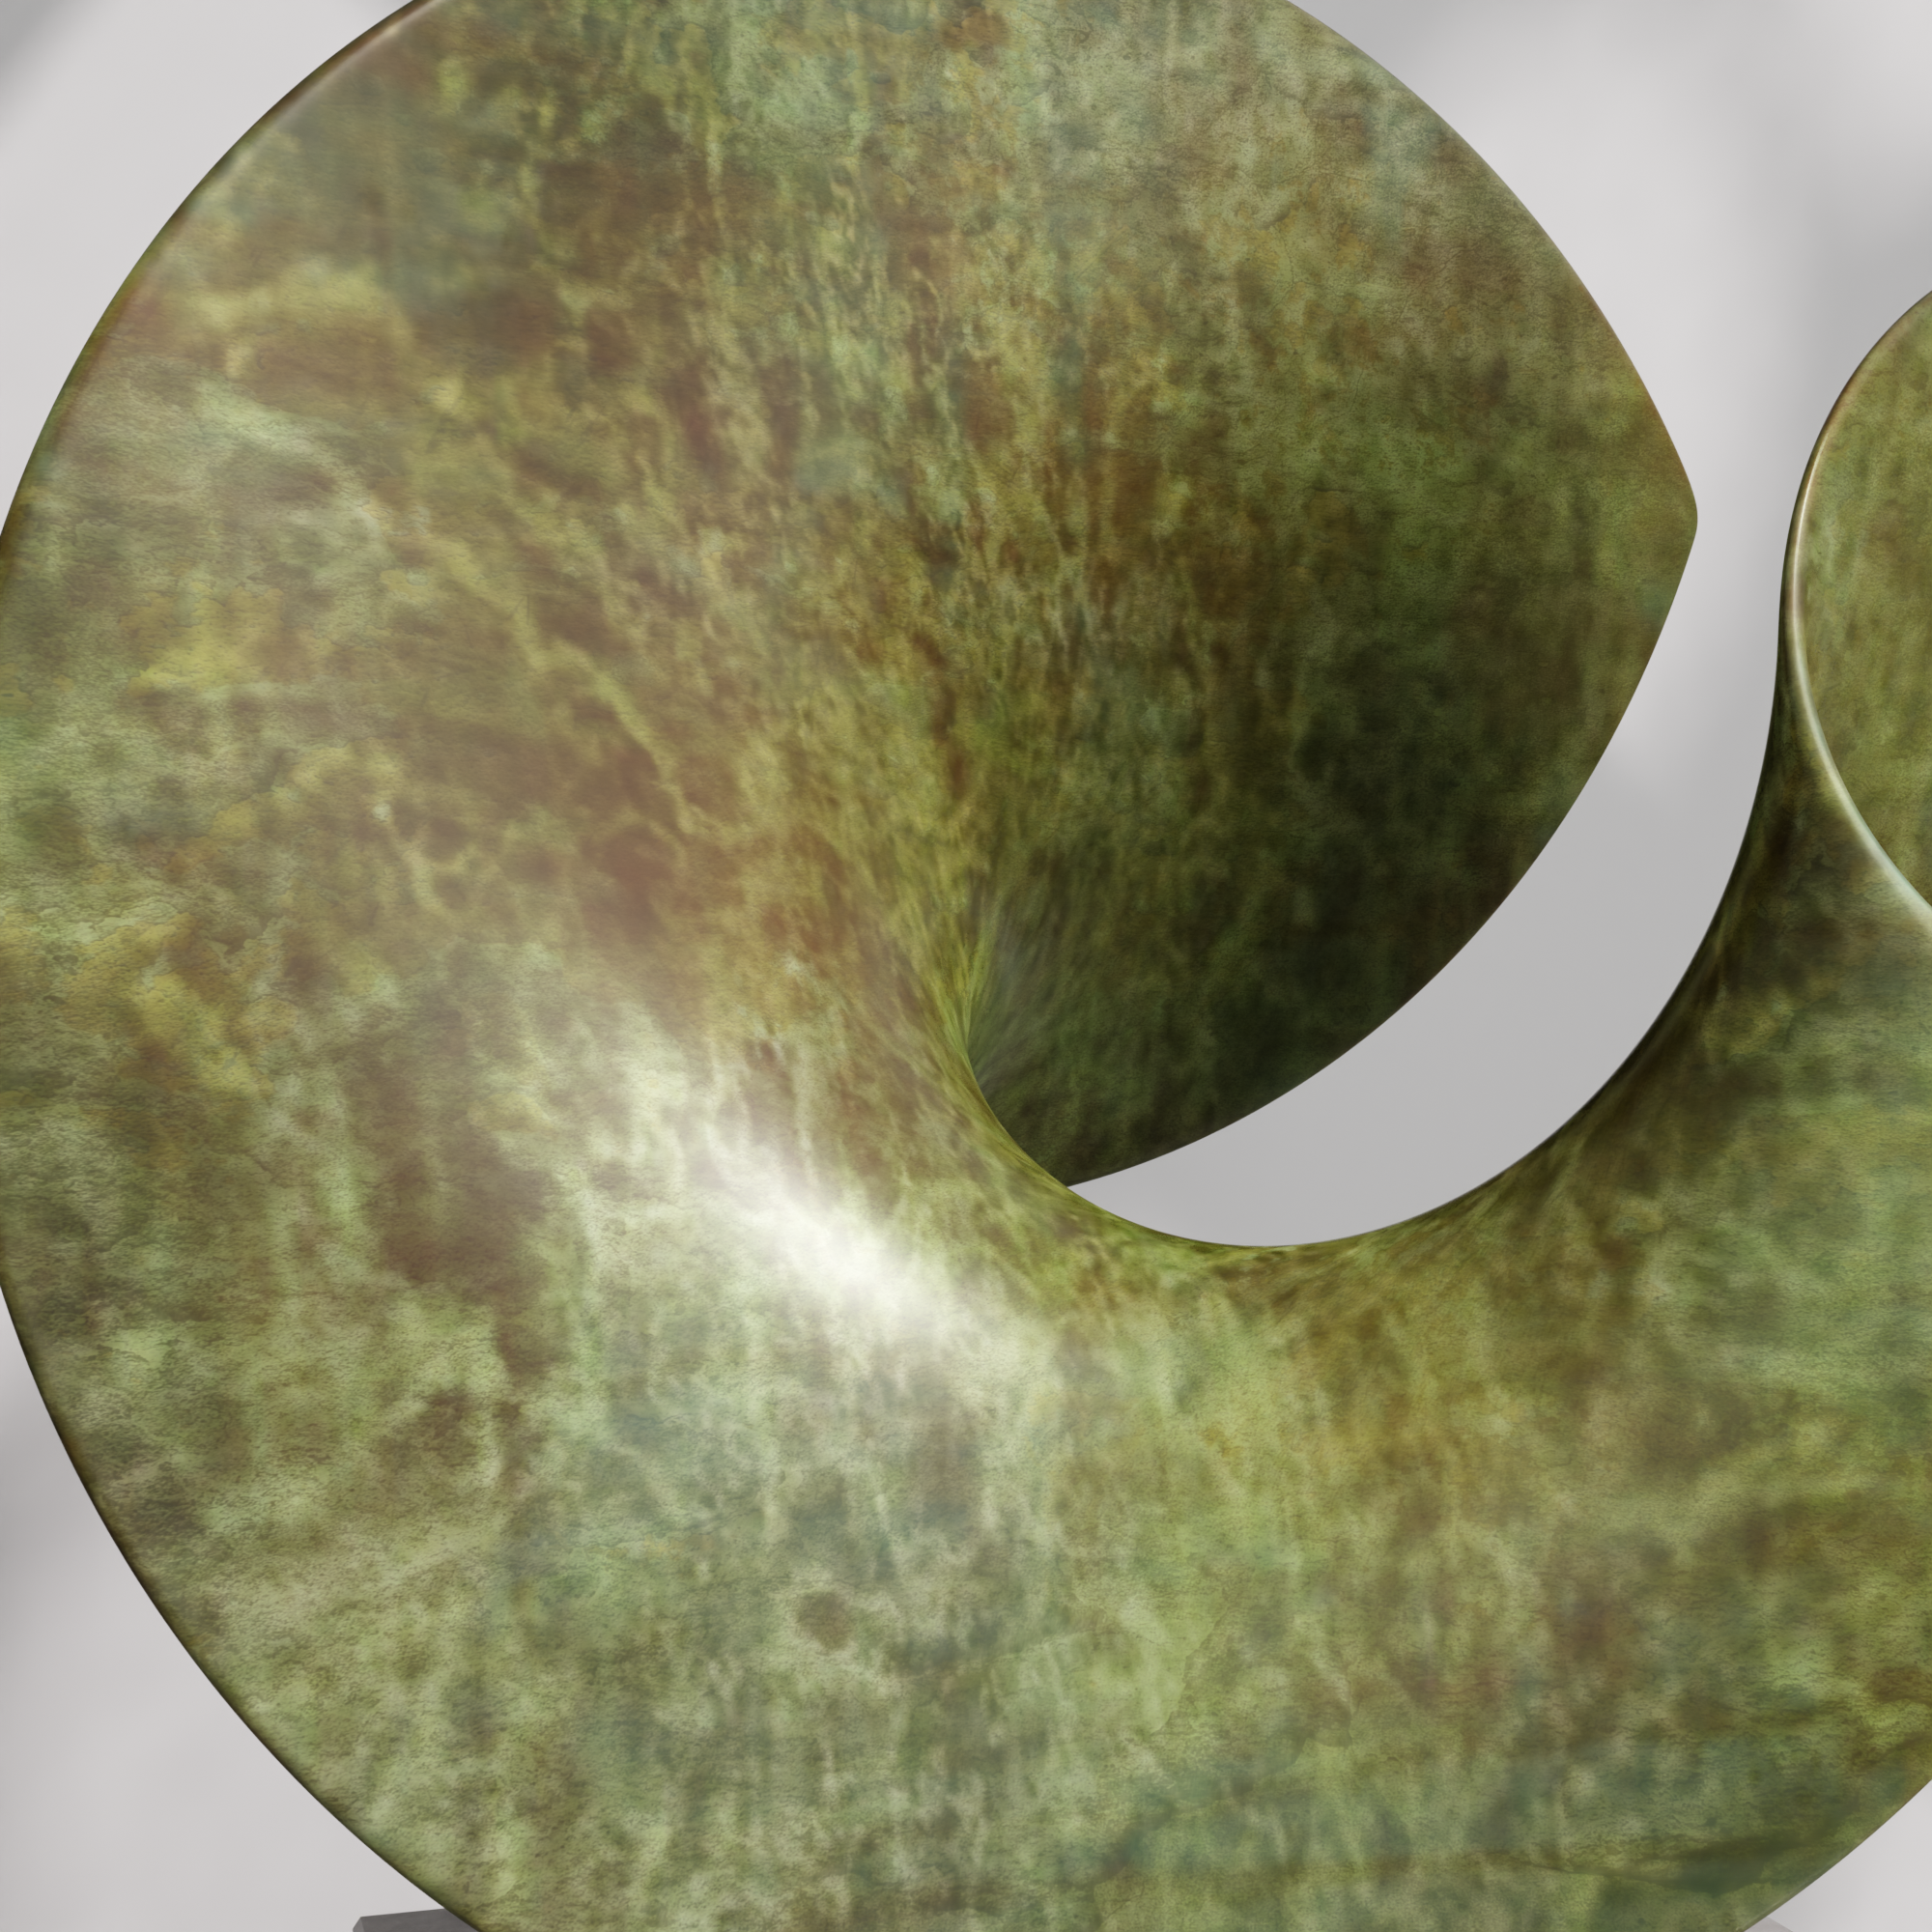
Iron and Copper Green Patina
Naturalistic patterned patina, with iron and green being the predominant colours. The contrasting colours create an intense, vibrant surface colour and when applied in thin layers a real translucent depth can be achieved. The application of this patina is straight forward, the patterning is dictated by the brush, the balance of colours and the quantities of chemicals in the solution.
Metal Preparation
Material : Cast Silicon bronze
Surface Prep : Sand to a smooth 80 or 120 grit finish to ensure optimal adhesion.
Base Coat Colour
Chemical Used : M20 Antiquing Solution / Liver of Sulphur / Ammonium Sulphide
Warm the bronze gently, taking care not to overheat.
Apply a weak solution of M20 evenly, allowing the surface to develop colour gradually.
Rinse thoroughly with water and brush to neutralise the reaction and remove residue.
Heat until a fine dusty film forms on the surface, then use a soft abrasive pad (e.g., 120 grit Scotch-Brite) to remove it.
Wash and repeat until you reach the desired finish.
First Coat
Water 250ml
2 teaspoons Medium Copper Nitrate
1/4 teaspoon Iron Nitrate
Heat the bronze evenly so the solution lightly sizzles and evaporates upon contact.
Carefully take small amounts of solution into the brush at each application, as the brush warms up it naturally sucks the solution into the brush.
Use a small brush to mix the solution, the two main components will settle out over time.
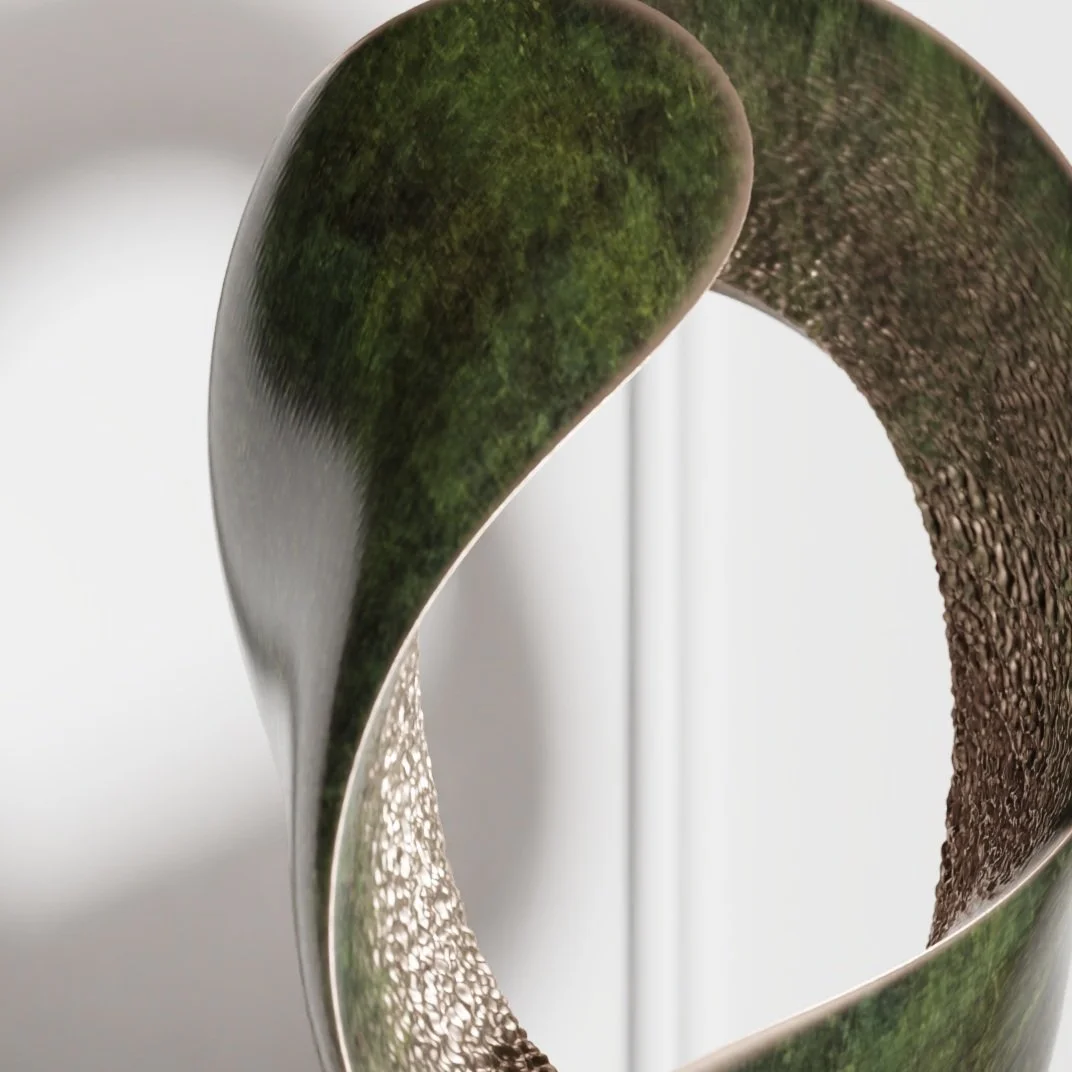
The oxide that forms on the surface of the bronze should develop into a green hoop or ring with a blurred iron centre. Using different shaped brushes and applications you will be able to develop different patterning.
The two main chemicals in this solution can easily be adjusted, just be aware that iron is much more intense than the copper nitrate.
Leave parts of the dark base coat or bronze visible for contrast.
Finishing Touches
1. Sealing
Sculpt Nouveau Smart Coat (1K Polymer Sealant) / Incralac Lacquer
Apply thin coats at room temperature using a soft cloth or brush.
Allow each coat to dry completely before applying the next.
2. Highlighting
Mix a small amount of pigment with the sealant and use a sponge or brush to add subtle highlights where needed.
3. Shadowing
Prepare a translucent paste by thinning graphite wax with clear wax.
Apply to create shadows or darken areas as desired, either under or over the final wax layers.
Final Waxing
Renaissance Wax / Paste wax /Ceramic Wax
Apply thin layers with a soft brush.
Let each layer sit for 10 minutes to evaporate, then buff to a hard finish.
Repeat 3–4 times for a rich, durable surface.
Tips for Success
Avoid overloading the brush to prevent solid, opaque patches. Focus on a light, broken texture and gradually build up a consistent pattern.
Control heat to avoid unwanted discolouration.
Sealing enhances the patina’s vibrancy, much like dipping a dusty pebble in water to reveal its colours.
Adjust the recipe to develop variations to suit your specific needs.
Emerald Green Patina with Light Detailing Recipe and Method
Emerald Green Patina with Light Detailing
This patina and associated technique can produce a wide range of vibrant emerald green pattern with delicate detailing and a contrasting dark background. The primary colouring agent is genuine chromium oxide, which bonds strongly to bronze and maintains its stability and vibrancy even under high heat. Careful application ensures a balanced and layered effect, avoiding an overly opaque or solid appearance.
Metal Preparation
Cast Silicon bronze
Sand to a smooth 80 or 120 grit finish to ensure optimal adhesion.
Base Coat
M20 Antiquing Solution / Liver of Sulphur / Ammonium Sulphide
Warm the bronze gently, taking care not to overheat.
Apply a weak solution of M20 evenly, allowing the surface to develop colour gradually.
Rinse thoroughly with water and brush to neutralise the reaction and remove residue.
Heat until a fine dusty film forms on the surface, then use a soft abrasive pad (e.g., 120 grit Scotch-Brite) to remove it.
Wash and repeat until you reach the desired finish.
First Coat
Solution 1 :
250ml water
1 teaspoon weak copper nitrate solution
Solution 2 :
250ml water
½ teaspoon chromium oxide
add a small amount of weak sodium silicate solution (as a fixative)
Heat the bronze evenly so the solution lightly sizzles and evaporates upon contact.
Stir solution 2 often to keep chromium oxide suspended, as it settles quickly.
Apply both solutions in small amounts with a natural-hair brush, working in a dabbing motion to create a broken, mottled green pattern. Avoid pooling or runs to maintain a light, transparent effect.
Leave parts of the dark base coat or bronze visible for contrast.
Second Coat
250ml water
3–4 teaspoons strong copper nitrate solution
Weak sodium silicate solution
While the bronze is still warm, carefully apply the solution to avoid overheating, which can cause discolouration.
Use a natural-hair brush to apply the solution in delicate dabs, allowing it to evaporate naturally.
Create loose, naturalistic light blue patterns that complement the green base. The patterns should appear slightly larger than the brush head.
Third Coat
250ml water
2 teaspoons medium copper nitrate solution
½ teaspoon chromium oxide
Weak sodium silicate solution
Maintain the heat from previous coats; reheating from cold can cause patchy brown discoloration.
Apply small amounts of the solution with a natural-hair brush, stirring frequently to keep the chromium oxide evenly suspended.
Focus on creating intense green patterning that mutes and balances the earlier light blue layers, adding depth to the patina.
Finishing Touches
Sealing
Sculpt Nouveau Smart Coat (1K Polymer Sealant) / Incralac Lacquer
Apply thin coats at room temperature using a soft cloth or brush.
Allow each coat to dry completely before applying the next.
Highlighting
Mix a small amount of pigment with the sealant and use a sponge or brush to add subtle highlights where needed.
Shadowing
Prepare a translucent paste by thinning graphite wax with clear wax.
Apply to create shadows or darken areas as desired, either under or over the final wax layers.
Final Waxing
Product : Renaissance Wax / Paste wax /Ceramic Wax
Apply thin layers with a soft brush.
Let each layer sit for 10 minutes to evaporate, then buff to a hard finish.
Repeat 3–4 times for a rich, durable surface.
Tips for Success
Apply chromium oxide sparingly to prevent solid, opaque patches. Focus on a light, broken texture.
Maintain consistent heat to avoid unwanted discolouration.
Sealing enhances the patina’s vibrancy, much like dipping a dusty pebble in water to reveal its colours.
Adjust the recipe to develop variations to suit your specific needs.